How to Build a Self-Hosted WordPress Website
DISCLOSURE: This article may contain affiliate links. Which means we make a commission, at no cost to you, on products and services we recommend that you decide to buy. Read our full disclosure here.
In this article, I’m going to explain the process I use for setting up a self-hosted WordPress website. This is something I’ve done so many times since I discovered WordPress in 2006, that I’ve lost count.
There are the five steps you need to take to build a basic self-hosted WordPress website (we’ll cover each of them in more detail further down the page). They are:
- Buy yourself a domain name using a company like Namecheap (the one I use and recommend)
- Buy suitable web hosting – ‘shared’ hosting is inexpensive and perfect for most people building their first website or blog (I’m based in the UK and use Guru)
- Install WordPress (read: what is WordPress?)
- Customize WordPress
- Add content to your new WordPress website or blog
If you follow each of these steps, you’ll have a brand new website in a few short hours. On top of that, you’ll have learned a brand new skill – how to build a website!
Let’s get the ball rolling by taking a brief look at our chosen software for building a website, WordPress.
Why choose WordPress to build a website or blog?
WordPress is the world’s favorite software for building websites and blogs. It powers more than 40% of all online properties including some operated by global brands like PlayStation, Disney, CNN and Spotify. (source)
So, if it’s good enough for those brands, it’s good enough for you and me, right?
Here are some of the reasons why people choose WordPress:
- It’s versatile – you can build all sorts of websites with WordPress
- The WordPress community works hard to create plugins and themes to make better websites
- The base software is free
- It’s always improving
And last but most definitely not least, installing WordPress is easy.
Most web hosting companies, provide an automated solution that does the hard work for you.
All you need to add is your site’s name, your username and your password. Depending on the host you choose, you might be asked to choose from other settings too. But we’ll cover these in more detail later.
Here’s a screenshot from inside a typical hosting account (yours may vary).
To install WordPress, click the Install this application button and follow the onscreen instructions.

That’s all you have to do to set up WordPress with most web hosting companies.
Looks simple, right? That’s because it is.
Okay, so that’s a quick overview of how to set up WordPress. But before you get to that stage, you need to consider the other parts of the process – choosing a domain name and buying hosting.
1) Choose a domain name for your website
To create a website, you need two things: a domain name and web hosting.
We’ll get to web hosting in a moment, let’s look at domain names first.
What is a domain name?
The term ‘domain name’ refers to the web address people type into their browsers to view the homepage of your website.
In our case, it’s ‘digital-internet.com‘.
We’ve chosen a domain name that lets visitors know what our website is about straight from the get-go. We also want to attract visitors from around the world, so we’ve chosen to use the .com extension.
If you want your website to target people in a specific country, you’re best choosing a domain name that ends in that country’s code.
For example, websites in the US end with .us, in the United Kingdom it’s .co.uk or .uk, Germany is .de and Australia is .com.au.
If you want to attract people from around the world, choose a .com domain.
Where do you buy a domain name?
A lot of web hosting companies let you have a free domain for the first year when you sign up for their services.
It’s the easiest and quickest way to get a website online for complete beginners. Take a look at the screenshot below for an example.

When the free period ends, you can renew your domain for another year (or more if you like) for around $10-$20 – depending on the host.
Experienced website owners and bloggers prefer to buy domain names from one company and hosting from another. Then connect them through the DNS (Domain Name System) settings.
It sounds confusing and technical and it is for most beginners. So, for your first website, you might prefer to buy the domain and hosting from the same provider.
This will make the setup process that much easier.
If you do want to buy a domain name on its own, I recommend Namecheap. First-time purchases and renewals are cheap and their system’s easy to use. They have good online support via a chat facility too.
How much does a domain name cost?
Prices for domain names vary from one company to another.
On a good day, you can pick up a domain through a special offer or by using a discount code for as little as $1 for the first year. On average, a .com domain costs between $10-$20 per year, and country-specific domains typically cost a little less.
Specialist domain extensions are usually more expensive.
2) Buy web hosting from a reputable company
In this next section, we’re looking at web hosting – what it is, what’s the best option for a brand new site, and how much you should pay.
What is web hosting?
The term ‘web hosting’ refers to the location of all the stuff you need to run a website. Think about the software (WordPress), images, files (PDFs, MP4s, AVIs etc), and you’re in the right place.
What’s the best hosting for a brand-new website?
There are a few different types of hosting available.
The cheapest and most popular for new websites is ‘shared hosting‘.
The term ‘shared’ means your website shares server space with other websites. It’s perfectly fine for beginners and sites with low traffic. (Read more here: What is Shared Hosting?)
When your website gets popular, you may find a few issues start showing up. Typically, they’ll slow down your website’s loading times and provide a poor user experience.
When this happens (which is a good thing, right?), it’s time to upgrade your hosting with your current provider or move to a new one.
Of course, a sudden spike in traffic may die down within 24 hours, so don’t rush out to upgrade your hosting if this happens. Only upgrade when you see an increase in traffic that looks like it isn’t going away.
Once again, upgrading might sound difficult and technical. But it’s often as simple as clicking an ‘Upgrade Hosting’ button inside your account.
Moving your website to another host is quite technical but a lot of companies offer a free migration service when you move to them. So you don’t need to worry about doing that.
How much does web hosting cost?
For the sake of this article, let’s stick with ‘shared hosting’ and its nearest equivalent, ‘cloud hosting.’
To host one site with Bluehost (a popular option for beginners), the first year costs under $60 (at the time of writing and without any add-ons).
After the first year is over, the price jumps to $120. Which is about the average price for shared hosting.
Some web hosting companies accept monthly payments while others only accept yearly payments. Typically, the longer the period you pay for, the cheaper the price.
3) Install WordPress
Once you’ve bought your domain name and hosting, the next step in the process is to install WordPress.
Back in the day (circa 2006), when I was new to WordPress, I did this manually and the process frazzled my brain. These days, it’s as simple as clicking a button and following the on-screen instructions.
All the technical stuff – creating a database, adding a user to the database, and running through the setup process gets done for you.
The exact method varies from host to host, but typically, you’ll need to provide some or all of the following information:
- An admin username (the name you use to log in)
- An admin password (choose something hard to guess)
- An admin email address (your main email)
- Your website’s title (you can change it later)
- Your website’s tagline (you can change it later)
You might also be asked, by virtue of checking radio buttons, if you’d like to add additional features such as two-factor authentication and limit login attempts.
Once the form’s complete, hit the Install button and let the system set up your site.

It typically takes about a minute or so. Once it’s set up, you’ll see the login details on your screen. You may also be asked if you want to receive the details in an email. I recommend you say yes and store that email somewhere safe.
You should now have a fully working WordPress website! It’ll look something like this.

There’s not much to look at right now, but the basic structure’s in place so all you need to do is build upon it. Which is what we’ll get to now.
So, using the details provided, log into the backend of your website.
The URL typically looks like this: https://yourdomain.com/wp-login.php
Once you’ve entered your username and password, you’ll be taken to the dashboard area, which looks like this as of March 2022.

There is more to this screen than what you see here. When you click the X Dismiss link in the top right corner, the blue banner disappears revealing a site of widgets you can use to manage your site. Some of these are useful, some aren’t.

Every time you log into your website you’ll land on this page. From here, you click on the links in the menu on the left to do whatever work you need to do.
- Home – the dashboard area you can see in the screenshot
- Updates – this page displays a list of WordPress, theme, plugin and translation updates that are available for your site
- Posts – where you create, edit and manage posts
- Media – where you upload and manage media files such as jpegs, MP4s etc
- Pages – where you create, edit and manage pages
- Comments – where you manage comments (if enabled)
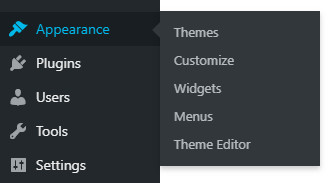
- Appearance – the place to go to when you want to find a new theme or manage the ones you have (including customizing)
- Plugins – the place to go to when you want a new plugin or manage what you already have installed
- Users – create and manage users if you’re running a multi-author website or blog
- Tools – a selection of tools for managing your website
- Settings – various settings for your website
- Limit login attempts – this is a plugin installed by my hosting company so you may not see this on your site
- Collapse menu – an option to narrow the menu so you see icons instead of text
Click on each of the links to familiarize yourself with each section.
Now we’ve had a quick look at the dashboard and admin area, the next steps in the process involve making your site look good and adding some functionality.
We do this by installing a theme and some plugins.
4) Install a WordPress theme that suits the purpose of your website
Okay, so you might be thinking ‘what is a theme?‘.
In WordPress, a ‘theme’ is a series of custom files and templates that create the look of your website.
There are thousands of free themes available from within your WordPress site, but if you’re wanting something a bit special, you could buy a ‘premium theme’ from one of the many WordPress premium theme shops.
Let’s stick with a free theme for now. You can always look at the premium options later.
WordPress comes packaged with three default themes. Upon installation, the latest theme, Twenty Twenty-Three activates.
For some people, one of the default themes is good enough. If it isn’t good enough for you, take a look around the theme directory for a better one. To access the themes, click on Appearance > Themes in the main menu on the left.
In your new installation, the screen will look like this.

On the Themes page, look for the Add New button at the top of the page or the Add New Theme section in the bottom right corner and click.
On the next page, you’ll see a whole load of free WordPress themes.

What you’re presented with is a group of thumbnails representing the themes.
When you click on the one you like the look of, you’ll be taken to a demo page so you can see the theme in more detail and in demo mode.
When you find a theme you like, click on the Install button.

The theme installs in a few seconds. Once installed, the button changes to Activate so you can activate it.

Then Customize, so you can, yep, customize it.

The WordPress theme customizer
Inside the WordPress admin area, there’s a tool called Customizer. This section lets you make changes to the installed theme so you can customize its look and feel.
Each theme has its own set of options, and some have more options than others.
Typically, they let you:
- Change fonts for different sections of the site including body text, headlines, menus
- Create your own color scheme for the whole site or just certain sections of it
- Define your own layout on a sitewide basis or by page type eg blog post, web page or archive (category)
- Choose whether to use a sidebar or go full width
- Create customized header and footer sections
- Choose between hiding or displaying certain sections of a blog post such as the category it’s posted in, tags, author name, publication date etc
- Enabling or disabling comments
- Displaying or hiding the breadcrumb menu
The list goes on and on but as you can see, you have a lot of control over the look of your website – without the need to go anywhere near code!
Take a look at the screenshots below, which are taken from the customizer for the popular free theme, GeneratePress, to get an idea of how this section looks and works.
When you first access the customizer, you’ll see a menu like this, where you choose the area you want to customize. We’re going to tweak the Header for now. So, click on Header.

Now we’re in the Header section, we have a few options to choose from to customize this area of the site.

People have a lot of fun using the Customizer! All the changes you make are visible on the page so you can see what your site looks like every time you make a small change.
However, just because you can do this doesn’t mean you should. If you’re uncomfortable using the Customizer, choose a theme you like and leave everything set to its default settings.
5) Install some WordPress plugins
A plugin is an additional script that adds functionality to the core WordPress files. A plugin can contain one file with a few lines of code or hundreds/thousands of files with multiple lines of code. It all depends on the job it’s doing.
Once you discover the world of plugins it’s easy to go crazy and install more than you need.
I’d advise against that in the early days because they can have a negative impact on your site if you install an underperforming plugin or one that conflicts with another.
To install a WordPress plugin, click on Plugins > Add New in the menu on the left.
When you access this section, you’ll see a screen like this.

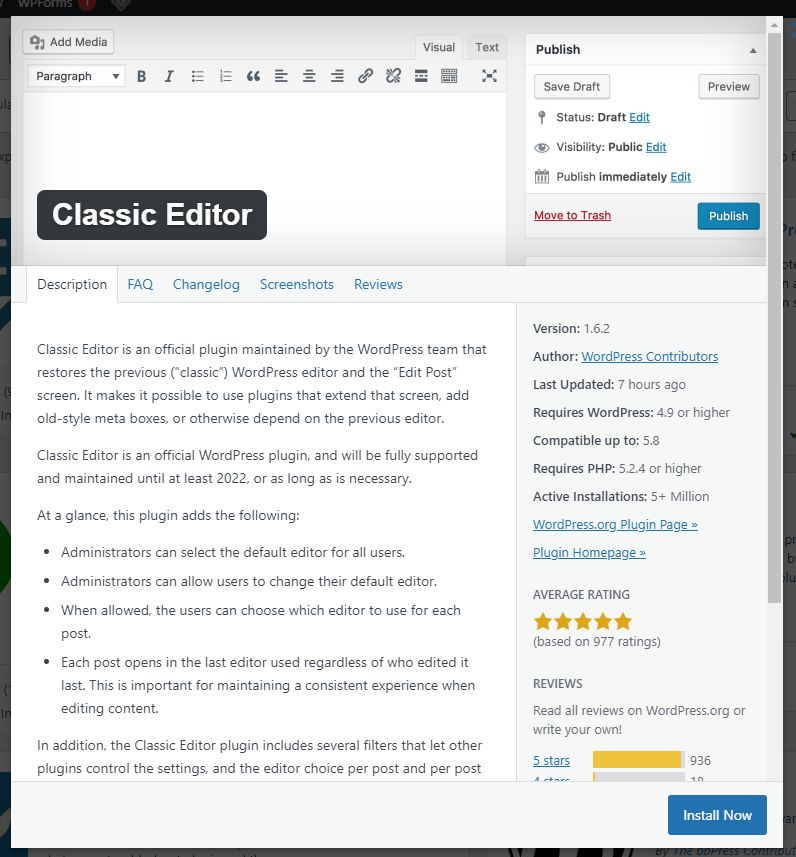
And here’s a detailed look at one of those plugin boxes.

In the top right-hand corner, there are two links. One says Install Now and the other says More Details. I recommend clicking on More Details before installing a plugin.
The More Details link opens up a lightbox window so you can read more about the plugin.
The information here can be a little techie but typically look for plugins with good reviews, that are up to date and compatible with your version of WordPress. Most other features will be specific to your needs.
When you’re happy, click on the Install Now button to install the plugin.
The lightbox window will close, you’ll return to the main plugins page, and the Install Now box in the right corner will say Activate.

Click the button to activate the plugin.
Once the plugin’s activated, more often than not, you’ll need to set it up. The way to do this varies from plugin to plugin. You generally find the options in the left-hand menu under Tools, Settings, or in its own section.

In this screenshot, my plugins for SEO, Link Whisper and LiteSpeed Cache have their own link in the menu. Other plugins sit under Settings or Tools and some plugins place themselves near the top of the menu.
What plugins do you need?
Every website has different needs and what may be ‘essential’ to me, may not matter to you. For example, many people are ditching SEO (search engine optimization) plugins in favor of using the theme’s options instead.
When you set up your first website, especially if it’s a content-based website that provides information, I would forget about installing plugins and concentrate on adding the content. As you go along, you’ll discover the plugins you need when you want to perform a certain task.
I realize this information is a little vague, so here’s a list of the plugins I use on this site, which is almost 100% based on providing information to its readers.
- Ad Inserter (for placing ads inside content)
- Insert Headers and Footers (for placing Google Analytics code in the head section of all pages)
- LiteSpeed Cache (for creating cached copies of the website’s pages so they load quicker)
- ManageWP Worker (for website backups)
- Pretty Links (for managing affiliate links)
- The SEO Framework (for managing SEO settings)
- WP Forms Lite (for adding a contact form)
These plugins are installed and active all the time. If I need to do a task that requires a plugin, I’ll install the plugin, activate it, do the task, and then deactivate the plugin and uninstall it. You can do the same.
It’s worth saying, that I’ve worked on client sites that have 30-40 plugins installed. Which is fine as long as they’re well-coded and always updated. Problems occur when plugins aren’t updated, are badly coded or clash with another one in your setup.
I like to keep things lean and simple and run as few plugins as possible.
6) Add content to your new WordPress website
A website isn’t a website without content!
In WordPress, there are two basic content types. They’re called Pages and Posts.
In short; Posts are organized into Categories, while Pages stand alone in the website’s structure. Posts are typically used for blogging and Pages are used for the legal stuff, contact us and about us, etc.
Whichever one you choose to use, they’re created, edited, and published using the same editing screen although you will need to choose Post or Page before you start. And, if you later decide you want to change a Post to a Page or vice versa, there’s a plugin that can do that for you.
How to create a page in WordPress
In the left-hand menu, click on Pages > Add New
You’ll be presented with a screen like the one in the screenshot further down. It changes from site to site because it adapts itself to look like your theme, so you can better visualize how your content looks to viewers as you create it.
WordPress uses a series of blocks to create every section of the page. In this first screenshot, if you look to the right, you’ll see Page has a blue line under it. This indicates I’m working at the Page level. If you look at the second screenshot, you’ll notice I’ve added a title and some paragraphs of text.
If you look to the right again, you’ll notice Block is underlined, which means I’m working at the Block level. And if you look at the content section, you can see the Block I’m working on is indicated by a black square containing a + sign.


What this gives you is complete control over every element of the page. You can increase the font size, change text color, add background color and change the space between lines without ever touching code.
Some of the more popular blocks for simple information websites include:
- Headings, paragraphs, quotes, tables and lists
- Images, galleries, audio files and videos
- Buttons, columns, spacers and separators
- Embed content from YouTube, Twitter, Soundcloud, Spotify, Flickr, Vimeo and more
Once you get to know WordPress, you’ll be able to dig deeper into the rest of the blocks to create some amazing designs and layouts.
When you’ve added the content you want, hit the Publish button and your page is live on the internet! If you’re not ready to go live, just hit Save Draft.
To get used to using WordPress, create a few pages and use the different blocks to see what they can do. They can be easily deleted or changed later on.
How to create a Post in WordPress
In the left-hand menu, click on Posts > Add New and follow the same process as above. Once again you work at Post and Block level to build the ‘page’ seen on your live site.
Before you hit the publish button, you’ll need to add the post to a Category. Which you’ll have to create.
Categories are places for you to organize content on specific topics. You can go as wide or as narrow as you like, and you can use as many categories as you like.
I prefer to keep things simple and use broad categories, you might prefer to go narrower. A lot depends on the topic and the number of posts in the category.
Depending on the theme you use, you may see the name of the Category in the header or footer section of your post.
What next?
If you’ve followed along you’ll have a basic website in place by now. From here there is still plenty to do. Check out the tutorials below:
Recommended products and services:
- Namecheap for domain names and hosting
- Guru for UK hosting
- GeneratePress free theme with a premium version available (it’s the one used on this site)
*Please note, that this article contains affiliate links, which means, if you buy after clicking one of our links, we earn a commission from the sale.